opsled
Well-known member
Carl and Nytro arn't far from me and asked if I would put their 800 engine together. Sure.
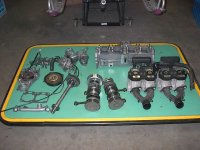
It showed up extremely well packed in a box but dissassembled. Story is 1200 miles, wrecked sled, engine taken down oiled and put into storage.
I believe. Everything looked in near new condition and was lubed, packed, bagged, marked, etc.
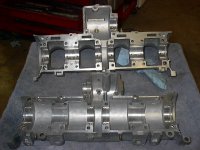
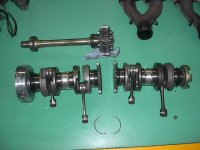
The crank and crankcases are perfect. I removed the recoil cup, flywheel and end crank seals. Cleaned, dryed and inspected everything. No issues. All was perfect. I couldn't replace the center two crank seals without gear pressing so they were going to stay. I also put the original end seals back in as they had no issues. Everything was assembled using Yamabond #5, torqued to spec and allowed to sit overnight. In the am I solvent tested the bottom end for leaks.
(My method for this test.)
The goal is to be assured that none of the seals in the lower end and the case seam is sealed properly. This can be done by filling the crankcase with fuel to a level above the top of end and center seals. If fuel runs out the seam, an end seal or across the center seal to the next crankcase cavity there is an issue. If not all is good. Easy test to do on any engine. Results are true as fuel will go through any imperfection as well if not better than air. Just don't fill two cylinders that are side by side at the same time as you won't know if the center seal between them is good. On this engine I tested 1 and 3 first. No leaks out the end, across the center or into the PTO gearcase. I then dumped the fuel from them, blew them out dry with compressed air and repeated on 2-4. Same results. No leaks. After everything was blown out and dry I oiled all the bearings liberally with a squeeze bottle while turning slowly by hand. The bottom was ready and tested good.
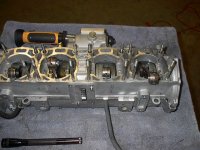
The heads water manifold and exhaust manifolds were removed as a unit when the engine was taken apart. The cylinders/heads looked pefect and I saw no reason to take them apart. I did take the water manifold off so I could put the cylinders back down two at a time instead of four (much easier). All that was needed here was a cleaning of the old base gaskets and oil film from storage.
The pistons were marked to the cylinder they came out of, bagged with their wrist pin and bearing with the rings still installed and oiled. Again here all that was needed was cleaning oil from storage. I reassembled everything in it's original position with new base gaskets and torqued to spec.
It is all together and comp tests at 125 PSI per hole right down the line with at most a 1lb variance.
The #'s have been machined off the case so it's a stamp your # and install engine. I wouldn't be afraid to put this engine in any sled and would trust it to take me anywhere.
If I had the $ it would be staying here.
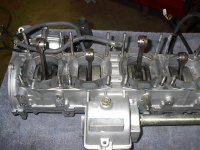
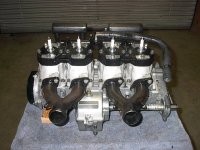
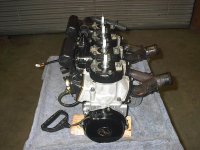
Here are some pics.
Note,, the two pics of the crankcase assembled were taken during the solvent test. You can see fuel in two of the case cavities.
These engines are cool!!
opsled
It showed up extremely well packed in a box but dissassembled. Story is 1200 miles, wrecked sled, engine taken down oiled and put into storage.
I believe. Everything looked in near new condition and was lubed, packed, bagged, marked, etc.
The crank and crankcases are perfect. I removed the recoil cup, flywheel and end crank seals. Cleaned, dryed and inspected everything. No issues. All was perfect. I couldn't replace the center two crank seals without gear pressing so they were going to stay. I also put the original end seals back in as they had no issues. Everything was assembled using Yamabond #5, torqued to spec and allowed to sit overnight. In the am I solvent tested the bottom end for leaks.
(My method for this test.)
The goal is to be assured that none of the seals in the lower end and the case seam is sealed properly. This can be done by filling the crankcase with fuel to a level above the top of end and center seals. If fuel runs out the seam, an end seal or across the center seal to the next crankcase cavity there is an issue. If not all is good. Easy test to do on any engine. Results are true as fuel will go through any imperfection as well if not better than air. Just don't fill two cylinders that are side by side at the same time as you won't know if the center seal between them is good. On this engine I tested 1 and 3 first. No leaks out the end, across the center or into the PTO gearcase. I then dumped the fuel from them, blew them out dry with compressed air and repeated on 2-4. Same results. No leaks. After everything was blown out and dry I oiled all the bearings liberally with a squeeze bottle while turning slowly by hand. The bottom was ready and tested good.
The heads water manifold and exhaust manifolds were removed as a unit when the engine was taken apart. The cylinders/heads looked pefect and I saw no reason to take them apart. I did take the water manifold off so I could put the cylinders back down two at a time instead of four (much easier). All that was needed here was a cleaning of the old base gaskets and oil film from storage.
The pistons were marked to the cylinder they came out of, bagged with their wrist pin and bearing with the rings still installed and oiled. Again here all that was needed was cleaning oil from storage. I reassembled everything in it's original position with new base gaskets and torqued to spec.
It is all together and comp tests at 125 PSI per hole right down the line with at most a 1lb variance.
The #'s have been machined off the case so it's a stamp your # and install engine. I wouldn't be afraid to put this engine in any sled and would trust it to take me anywhere.
If I had the $ it would be staying here.
Here are some pics.
Note,, the two pics of the crankcase assembled were taken during the solvent test. You can see fuel in two of the case cavities.
These engines are cool!!
opsled
Attachments
-
 Carl's 8BU 800 002.jpg98.6 KB · Views: 146
 -
 Carl's 8BU 800 003.jpg94.4 KB · Views: 146
 -
 Carl's 8BU 800 006.jpg96.3 KB · Views: 144
 -
 Carl's 8BU 800 007.jpg83.2 KB · Views: 146
 -
 Carl's 8BU 800 010.jpg120.9 KB · Views: 145
 -
 Carl's 8BU 800 009.jpg114.2 KB · Views: 146
 -
 Carl's 8BU 800 015.jpg109.3 KB · Views: 144
 -
 Carl's 8BU 800 016.jpg98.2 KB · Views: 142
 -
 Carl's 8BU 800 017.jpg114.3 KB · Views: 139
 -
 Carl's 8BU 800 018.jpg104.4 KB · Views: 139
Last edited: